
8 Steps to Home Grown Potatoes
1. Find the right place for your potato planter
Did you think you need a garden to grow potatoes? Nope! All you need is a planter and a warm and sunny spot - potatoes are perfect for urban gardening! Your patio or balcony offers plenty of space for growing spuds.
2. Choose the appropriate planter
Basically, you can grow potatoes in any tall container. However, we recommend the use of special planter bags, planter baskets and planters, as they are designed specifically for potatoes and will prevent root rot. Planters specially designed for potatoes also make it easier to harvest them.
Potato towers that consist of several levels for planting allow the most efficient use of space for planting potatoes. They are also suitable for growing vegetables and herbs so you can use them as a fully vertical vegetable garden.
3. Choose the right seed potatoes
Here's a quick overview of the many types of seed potatoes you could choose from. Depending on which variety you choose, one seed potato yields between half and one kilogram.
- Early varieties, firm: Agata, Amalia, Rosara, Christa, Gloria, Sieglinde, Princess
- Early varieties, floury: Augusta, Karlena
- Mid-early varieties, firm: Nikola, Saskia, Blue Swede, Bintje, Hansa, Cilena
- Mid-early varieties, floury: Agria, Afra
- Late varieties, firm: Granola, Bamberg croissant, Palma
- Late varieties, flour: Aula, Datura, Arran Victory
4. Allow the seed potatoes to germinate
Pre-germination is an indispensable step, because it not only leads to a higher yield but also offers natural protection against late blight. In addition, the progeny phase begins about ten to 14 days earlier thanks to pre-germination. We therefore recommend that you pre-germinate the seed potatoes in an egg carton for about four weeks at a temperature of about 15 degrees Celsius on the windowsill.
5. Start at the right time
When you can start planting your seed potatoes depends primarily on whether you have decided on an early, mid-early or late variety. Basically, you can plant early varieties from late March and late varieties until early May.
Regardless of when you plant your taters, the soil temperature should be at least 7 degrees Celsius. If there is still the possibility of a night frost, you should definitely cover your planter with a non-woven fleece hood.
6. Plant your potatoes right
Fill your planter about halfway up with soil - so you can still add the potatoes later, and follow the instructions on your seed packet when planting the potatoes. Make sure there is a planting distance of at least 30 cm between each potato so that the potatoes have enough space to grow. Having enough room ensures a better yield. Basically, for a 10-litre bucket, one seed potato is enough. For a 15-litre bucket, you can use two potatoes.
7. Take care of your potato plants
Potatoes need nutrients regularly, so you should use a fertiliser. When you see the first potato shoots, you should lightly cover the shoots with soil. This causes the plant to form many roots and many tubers. In addition, it is also important that you remove weeds regularly. This is especially important when the plants are young.
8. Harvest correctly
You can start harvesting your own potatoes around 100 days after planting the seed potatoes. You'll know it is time to harvest the potatoes when the foliage on the plants has died. Wait another 2-3 weeks and then harvest the tubers. Make sure to keep the plant moist during this period. Dig out a potato and check to see how easily the skin scrubs off with your fingers. If the potato's skin is firm and won't scrub off easily, it's ready!
We hope you enjoy growing your own potatoes!
Related products
-
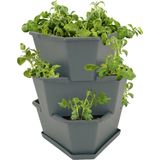
Paul Potato Potato Tower - Paul Potato Starter 3 Levels, Grey
- Grey
- Green
- Blue
- Set of 3 levels
- Innovative solution
- Practical and space-saving
Magazine Articles:
Discover Bloomling:
-
Free delivery in Austria
from € 39,90 -
Free
returns -
24-hour shipping
More than 9.900 products
